
Tips for Exporting Your Universal Analytics Data
by Julie Fiedler on March 5, 2024

With Google Analytics’ transition from Universal Analytics (UA) to Google Analytics 4 (GA4) last year, you’ve probably updated your tracking to the new format (at least we hope you have!). But soon, you’ll lose access to your historical data. On July 1, 2024, Google Analytics is deleting all UA account information.
Don’t panic! Even though you won’t be able to access the UA platform, you can download and export your past data to reference in the future.
Here are some tips to help you create and implement a data migration plan.
Identify Key Metrics
What's important to you? If you’re a data rock star, you may have already identified key performance indicators (KPIs) to guide you. What if you haven’t been very engaged with your data? Not to worry! When you think about your website, what information do you typically want to know?
- How many users you had each month
- How users found your website
- Which pages people viewed
- Where your users are located
Come up with a list of metrics that are meaningful to your organization. This will help you determine which reports to export and what level of detail you want in your data. You don’t need to export every report available in UA — only what will be most useful for your organization.
Know the Report Setup and Settings
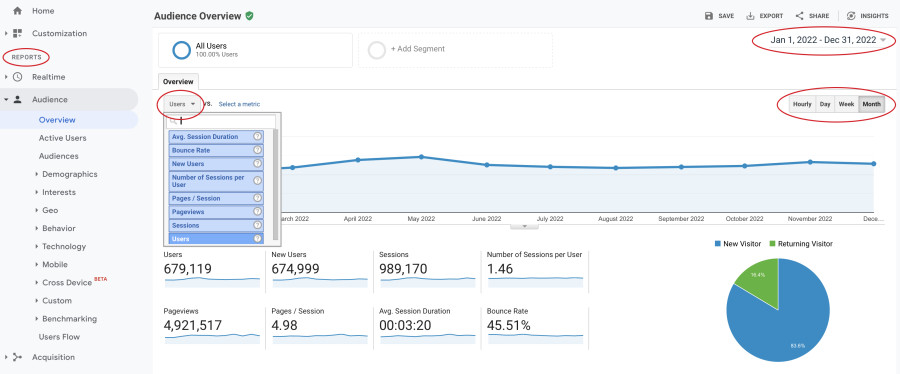
UA will only export what you tell it to, so it’s helpful to know how to toggle information. Here is the basic layout.
- A menu of available reports is on the left side of the screen.
- The time frame is in the upper right corner.
- Available time increments are just below the time frame.
- For overview pages, you may change the selected metric using a drop-down menu.
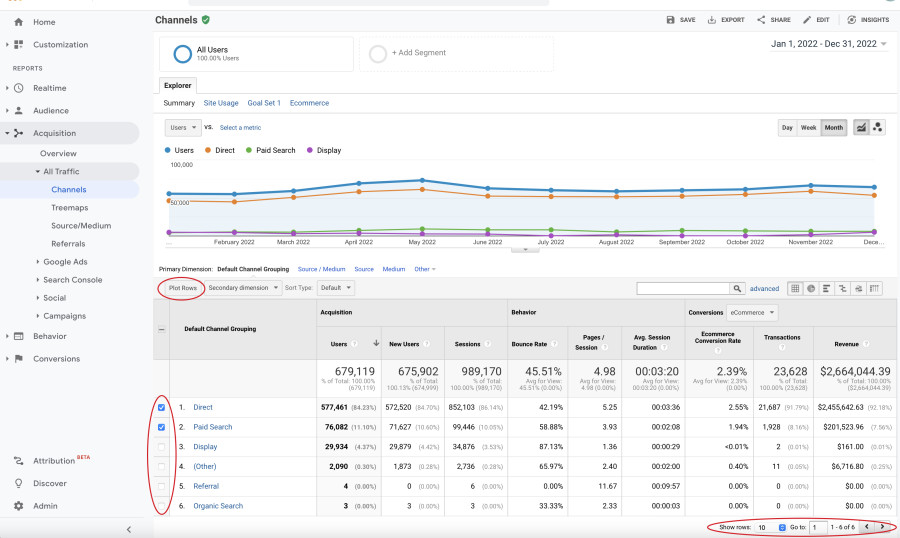
For reports in a table format, you have some additional options.
- If you select individual metrics and click “Plot Rows” in the upper left-hand corner of the table, the export will generate a separate sheet for each metric selected in Excel.
- If you have more than 10 rows of data in a report, you can toggle “Show rows” in the lower right-hand corner of the table to display more metrics. The export will include the number of rows shown.
Determine the File Types for Your Exports
You have the option to export reports as PDF, Google Sheets, Excel and CSV files. Google has step-by-step instructions for how to export files.
So, which file format should you use when you export your reports? Here are some pros and cons for the different file types. Note that you will export individual reports separately, so you can export one report as a PDF and another as an Excel file.
- PDFs are great if you want to capture a report’s visualization. For example, if you export Geo data as a PDF, you will have access to the map view. Just make sure to adjust the map to the level you want (global, national or by state) before exporting.
- Google Sheets are handy if you want to easily share information with your colleagues or have easy access from anywhere. A drawback is that it puts all the data on a single sheet, even if you select multiple data points to include. You will have one running column for each dataset, which may require additional organization.
- Excel spreadsheets parse data across multiple sheets, making them easier to organize. For example, if you export users by device for January 2022 through December 2022, Excel will provide separate sheets for desktop, mobile and tablet users for each month. The downside is that it doesn't identify which metric is on which sheet. It simply labels them Dataset1, Dataset2 and so on. Once you do the export, rename each sheet with the actual metric. Otherwise, you'll have no idea later which sheet is for which device type. Similarly, Excel doesn't provide a label for the time increments. For example, if you export January 2020 to December 2021, it won't list January 2020, February 2020, March 2020, and so on. Rather, it gives a month index of 0000, 0001, 0002, and so on. Again, you'll want to update that label yourself, so you know which period each metric is for.
- CSV. Honestly, I can't think of a use case where you'd want a CSV. If you need that format, export to Excel and then convert the data you want to CSV. To me, Excel is easier to read and manipulate. But if CSV is your jam, go for it.
Select Specific Reports and Formats
Put the pieces together! Using the key metrics you identified above, the applicable settings in UA and the export file descriptions, map out the corresponding reports you want to export and in which format. Feeling stuck? The reports below are a great starting point to provide your organization with benchmark data moving forward.
Must-Have UA Reports to Download
- Audience > Overview
- A PDF export will provide visuals of metrics for the entire time frame you select.
- To have granular access to individual metrics over time, select the time frame, time increment and metric (using the drop-down menu above the line chart) and export as Excel. You may wish to do this several times with different metrics selected from the drop-down menu.
- Audience > Demographics > Overview
- We recommend exporting this as a PDF. This may come in handy, especially as this data becomes harder to access with more stringent privacy controls.
- Audience > Interests > Overview
- We recommend exporting this as a PDF. Again, this data will become harder to access with more stringent privacy controls.
- Audience > Geo > Location
- We recommend exporting this as a PDF. Make sure you select the level of detail you want in your map before running your export.
- Acquisition > Overview
- Both PDF and Excel are nice to have for this report.
- Acquisition > All Traffic > Channels
- To drill down by month and analyze seasonal trends over time, we recommend exporting this report. To get really detailed, select multiple channels, click Plot Rows and export as Excel. This will give you a separate sheet of data for each channel by time increment.
- Acquisition > Campaigns > All Campaigns
- We recommend exporting this as an Excel file. Make sure “Show rows” (bottom right of the table) is set to capture all available campaigns.
- Behavior > Site Content > All Pages
- Change the Primary Dimension to Page Title for ease. If your website has been around for a while and you’ve changed the navigation and/or structure, you can include both Page (URL) and Page Title.
You may want to drill down even further. For example, let’s say you run a long content marketing campaign; consider exporting a report that shows the pages viewed from your campaigns. Or, if you want to see the 10 most impactful pages by conversion rate, sort by that metric within the table before running your export.
Get as granular as you want with your data!
Optional UA Reports to Download
Some data may become less impactful or actionable over time or when measured for longer spans of time. However, it’s better to have information available should the need arise. Here are a few more reports you should consider exporting.
- Audience > Behavior > New vs. Returning
- Audience > Behavior > Frequency and Recency
- Audience > Mobile > Overview
- Behavior > Overview
Follow These Best Practices
There’s a lot to keep in mind as you run your exports. Each report has different settings you can adjust, and sometimes Google will reset a setting when you navigate from one report to another. Here are some helpful reminders as you get going.
- Remember to double-check your settings before exporting! It’s easy to miss one detail and need to run a report more than once. Don’t fret! It happens to the best of us. Adjust and export again. (But before you do, delete the goof because it can get confusing fast if you don’t.)
- Set the correct date range. Since UA is being permanently deleted, we recommend downloading your files to include the full lifespan of your website. You could export separate reports for each year, but that would get cumbersome fast.
- Use the Month time increment instead of Hour, Day or Week. This will make it easier to calculate year-over-year comparisons. And, really, do you need all that data by day? (Yikes!)
- If you want a more detailed breakdown, select individual metrics in your table and click “Plot Rows.” Then, when you export your data, the file will have a dedicated sheet (if using Excel) for each line item. (Remember to rename those sheets if you do this! It’s not always clear which sheet is for which metric, so confirm the data points as you rename them. Also remember to rename the time increments in the sheet.)
- Make sure you’ve selected the appropriate number under “Show rows” in your table to export. UA defaults to showing 10 rows. If you don’t change that setting, you’ll get metrics for only those 10 data points no matter how many are available. On the flip side, you may not need every available data point. If your website has 3,000 pages of content, you might not want to export metrics for all 3,000 pages but instead focus on the top 100 pages by pageviews or average time spent on the page. (Make sure you sort according to the metric that defines your “top” before you run your export.)
- Err on the side of too much information. If you’re unsure whether you’ll need a report in the future, go ahead and download it. You never know what future efforts will need.
Implement Your Plan
Once you have identified the reports and formats, it’s time to download! Set aside some uninterrupted time to devote to this endeavor. Follow Google’s step-by-step instructions for how to export files.
If you prefer having everything in an email, you’ll notice the link above also includes steps for “sharing” a report. This option allows you to email yourself (or others in your organization) a copy of reports.
Once you export a report, validate the output. Is everything as you expected? Did your time frame accidentally get changed? Do you want to include subsets of data? What about a secondary column? You may want to toggle your settings as you go.
You might want to export multiple versions of the same report. Sometimes having a PDF with a visual and an Excel of individual data points over time is beneficial.
Speaking of Excel, as you export to this format, rename sheets and specific metric labels while everything is fresh in your mind. Tweak, label and organize as you go. You may also want to rename your files. The exported file names aren’t the most intuitive.
Do everything possible to ensure the records don’t get lost. Create a backup and make sure more than one person has access. If you work collaboratively, invite your colleagues to use the files too. That’s just nice manners!
Once you’ve exported everything, wait a day (or four!) and evaluate your exports with fresh eyes. Did you forget any reports? Do you want to see any different breakdowns? Did you miss a setting? If you have a willing colleague, go over the data together to see if they notice anything amiss or have suggestions of other metrics to capture.
Saying goodbye can be hard, but if you plan now, you don’t have to bid your data adieu. We recommend getting started sooner rather than later. You don’t want to be the kid who starts their science project the night before the big fair, do you? So, carpe diem and seize the data!
If you have trouble downloading records or run into more complex questions, we’re here to help.